Point of Interest (POI) actors are the fundamental building blocks for navigation and interactive events in AVE II. They serve as specific triggers that allow users to navigate the scene and access contextual information.
[!NOTE] If you have used Archviz Explorer previously, this workflow will be familiar. You can also copy existing POI actors directly from the demo levels to speed up your workflow.
Placing the POI Actor
The primary actor for this feature is BP_POI_Generic.
- Navigate to
Content > AVEII > Navigation > POIin the Content Browser. - Drag and drop the BP_POI_Generic actor into your Level viewport.
- Organization: To keep your project structured, create a folder hierarchy in the Outliner matching your intended categories (e.g.,
POI_Surroundings > Entertainment) and place the actor inside.
Configuring Info Data
Metadata settings control how the POI appears in the UI menu and on the map.
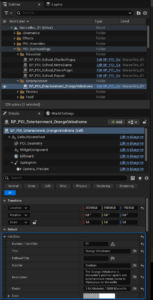
- Select the actor and locate the Info Data section in the Details panel.
- Number / Identifier: Set this to a unique number (e.g.,
01). This is displayed on the map icon when the POI is inactive. - Text Fields: Fill in the Title (e.g.,
Orange Vélodrome), Subtitle, and Description Footer. - Show in List View: Ensure this is checked so the POI appears in the menu.
- Sort Number: Determines the order in the list. Lower numbers appear at the top.
Adding Media and Adjusting Visibility
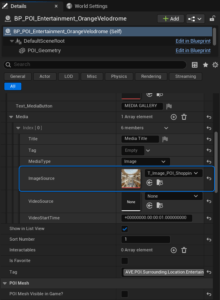
You can add a thumbnail image to the info panel and choose whether to show the 3D marker in the scene.
- Expand the Media array under Info Data and click the + sign to add an element.
- In Index [0], assign a texture to the Image Source field.[!TIP] For correct display, ensure textures have a 1:1 aspect ratio and use Power of Two dimensions (e.g., 512×512 or 1024×1024).
- To hide the 3D placeholder mesh during gameplay, uncheck POI Mesh visible in Game?.
Setting Camera Focus
These settings define the camera angle and distance when a user selects the POI.
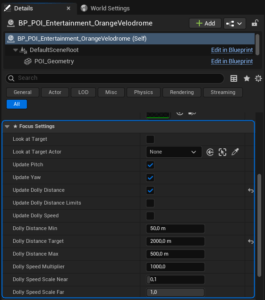
- Under Focus Settings, enable Update Dolly Distance.
- Set the distance value (e.g.,
2000) appropriate for your subject’s scale.
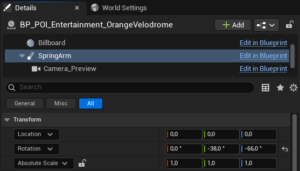
Select the SpringArm component (DefaultSceneRoot > SpringArm) in the Component hierarchy to rotate and adjust the default viewing angle.
Creating Custom Categories & Gameplay Tags
To organize POIs into custom categories (e.g., “Sports”), you must register a Gameplay Tag and update the UI.
Step A: Register the Gameplay Tag
- Open
AVEII > System > Data > DT_AVE_Tags. - Add a new row. Set the Row Name to your category (e.g.,
Sports). - Set the Tag Value to the correct hierarchy path, for example:
AVE.POI.Surrounding.Location.Sports. - Save and close the Data Table.

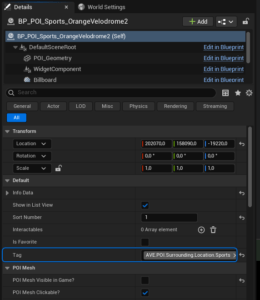
Step B: Assign the Tag to the Actor
- Select your POI actor.
- In the Details panel under Info Data > Tag, check the box for your new tag (e.g.,
Sports).- Note: You can check multiple tags to have the POI appear in multiple categories.
Step C: Update the UI Widget
- Navigate to
AVEII > UI > Menusand open the WB_Game_Menu widget. - Locate the WB_Surroundings_Panel widget in the hierarchy.
- In the Details panel, find the Tags array (under Default) and add a new element:
- Title:
Sports - Tag:
AVE.POI.Surrounding.Location.Sports - Icon: Select an icon (e.g.,
T_Icon_Bike_01). - bIsExpanded: Check this if the category should be expanded by default.
- Title:
- Compile and Save.